Keeping your car looking its best isn’t just about vanity—it’s about maintaining its value, protecting the paint, and ensuring that your driving experience remains enjoyable. Over the years, I’ve tried and tested several methods to clean and detail my car, and through trial and error, I’ve learned some pro techniques that make a huge difference. Today, I’m sharing my experience and walking you through how to clean and detail your car like a pro.
What You’ll Need for Clean and Detail your Own Car
Before diving in, let’s talk about the tools and materials you’ll need. Detailing isn’t just about using water and soap; it requires the right equipment. Here’s a list of essentials:
- Two buckets (for the two-bucket wash method)
- Microfiber towels (lots of them)
- Wash mitt or a soft sponge
- Car shampoo (pH-balanced is best)
- Detailing clay bar
- Spray detailer or clay lubricant
- Polishing compound
- Car wax or sealant
- Vacuum (for interiors)
- Glass cleaner
- Upholstery cleaner (if you have fabric seats)
- Leather conditioner (if you have leather seats)
- Tire and wheel cleaner
- Wheel brushes
- Trim protectant
- Interior protectant (like Armor All)
Now that we have everything ready, let’s dive into the actual process!
Step 1: Pre-Wash Prep – Rinse and Soften the Dirt
First things first—before you even touch your car with a wash mitt or sponge, you need to give it a good rinse. Start by using a hose or pressure washer to remove loose dirt, dust, and debris from the surface. This will minimize the risk of scratching your paint when you start scrubbing. This quick rinse makes a big difference, softening up the dirt stuck on the surface.
Pro Tip:
If you’re using a pressure washer, be cautious with how close you hold it to your paint. Keep it at least 2-3 feet away to avoid any accidental damage.
Step 2: Use the Two-Bucket Wash Method
To clean your car effectively (and safely), use the two-bucket method. Here’s how it works:
- Fill one bucket with clean water (for rinsing your wash mitt).
- Fill the second bucket with water mixed with car shampoo.
Start washing your car from the top and work your way down. Why? The bottom of the car is always dirtier, and you want to avoid bringing dirt from the lower parts to the cleaner areas. After every pass, dunk the wash mitt into the bucket of clean water to rinse out dirt before dipping it back into the soapy bucket.
Pro Tip:
Invest in grit guards for your buckets. These handy inserts trap dirt at the bottom of the bucket, preventing it from getting back on your wash mitt and scratching your paint.

Step 3: Time for the Clay Bar Treatment
After your car is clean and rinsed, it’s time to give it a little extra TLC by using a clay bar. Even after washing, your car’s paint may still feel rough due to embedded contaminants like road tar, sap, and industrial fallout. This is where the clay bar comes in.
Spray a clay lubricant (or a quick detailer) over a small section of the car’s surface, then gently rub the clay bar over that area. You’ll feel the clay picking up the contaminants, and soon, the paint will feel silky smooth.
Pro Tip:
Use a light touch. You don’t need to apply a lot of pressure—let the clay bar do the work. And remember to fold the clay regularly to expose a clean surface.
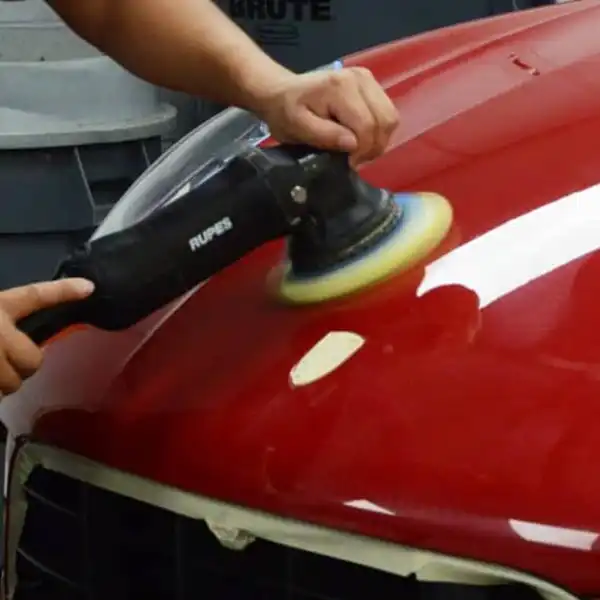
Step 4: Polish for That Extra Shine
Now that your paint is contaminant-free, it’s time to polish. Polishing helps remove light scratches, swirl marks, and oxidation, giving your paint a deep, mirror-like shine.
If you’re new to polishing, I’d recommend starting with a dual-action polisher (DA polisher). It’s easier to use and less likely to damage your paint than a rotary polisher.
Apply a small amount of polishing compound to the pad and work in small sections. Use a moderate speed, and let the polisher glide over the surface without putting too much pressure.
Pro Tip:
For best results, use a microfiber cloth to buff off the polish residue after each section.

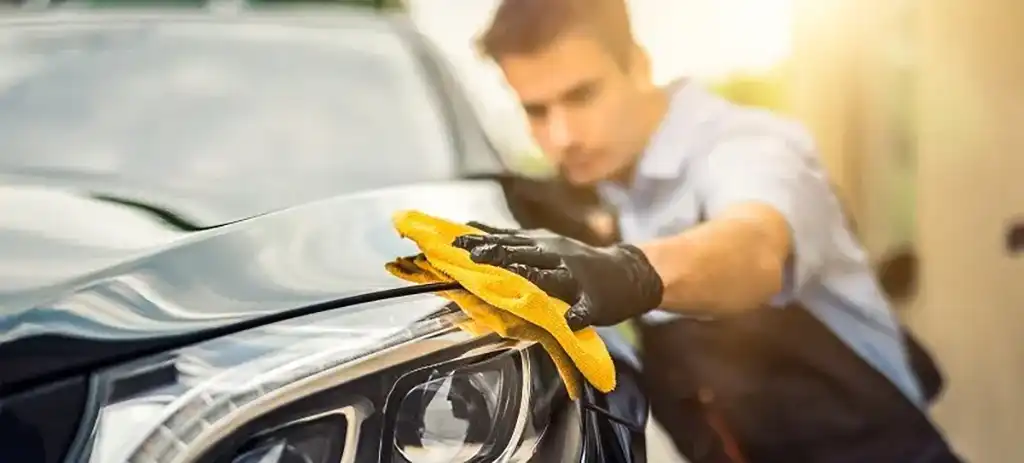
Step 5: Protect Your Work with Wax or Sealant
After polishing, you’ll want to protect all that hard work with a good layer of wax or sealant. Wax gives your car a deep, glossy shine and protects it from the elements. Sealants, on the other hand, are synthetic and tend to last longer.
Whichever you choose, apply the product with a foam applicator pad in a circular motion. Let it haze over, and then buff it off with a microfiber towel. Your car will not only look stunning, but it’ll also have a protective barrier to help repel dirt and water.
Pro Tip:
Try using a spray wax for touch-ups in between washes. It’s quick and gives an instant shine!
Step 6: Clean Those Wheels and Tires
While your car is drying, it’s time to focus on your wheels. Start by using a wheel-specific cleaner, as they’re formulated to break down brake dust and road grime. Spray it on and let it sit for a minute or two, then use a wheel brush to scrub each wheel.
Next, clean the tires with a tire cleaner. Make sure to scrub thoroughly, as dirt can really cling to tires. Once clean, apply a tire shine to give them that fresh, wet look.
Pro Tip:
Tires are often the dirtiest part of the car. Use separate brushes and towels for the wheels and tires to avoid cross-contamination with the rest of the car.

Step 7: Interior Detailing
Now, let’s move inside. Start by removing all floor mats and giving them a good shake or vacuum. Use a car vacuum to thoroughly clean the floors, seats, and nooks and crannies.
For fabric seats, use an upholstery cleaner to get rid of stains. If you have leather seats, a leather cleaner and conditioner is key to keeping them soft and crack-free.
Don’t forget to clean the dashboard and trim. I recommend using an interior protectant to protect against UV damage and give your dash a nice sheen.
Pro Tip:
Use a small brush or a toothbrush to get into tight spaces like air vents and seams for a truly deep clean.
Step 8: Clean the Windows and Mirrors
For streak-free windows, use a dedicated glass cleaner. Spray it onto a microfiber towel (not directly on the glass) and wipe in straight lines. Don’t forget to roll down the windows slightly to clean the top edge!
Pro Tip:
For best results, clean your windows in the shade. Direct sunlight can cause the cleaner to dry too quickly, leaving streaks.

Step 9: Final Touches
You’re almost done! For that final professional touch, go around your car and inspect any spots you may have missed. Wipe down the door jambs, apply a little trim protectant to plastic or rubber areas, and give the car one last buff with a microfiber towel.
Pro Tip:
Spray a bit of air freshener inside the car for that “new car” smell. You can even go for a more specialized product like ozone spray if your car has persistent odors.
Keeping Your Car Clean: Maintenance Tips
Now that your car looks pristine, you’ll want to keep it that way. Here are a few tips for maintaining that “just detailed” look:
- Wash regularly: Aim to wash your car at least once every two weeks. It prevents dirt buildup and keeps the paint in good shape.
- Use a spray wax: After each wash, use a spray wax to maintain the shine and protection.
- Vacuum frequently: Keep a small handheld vacuum in the car to quickly tackle dirt and crumbs.
- Protect your seats: Use seat covers or regularly condition leather to prevent wear and tear.
- Clean spills immediately: Whether it’s coffee or fast food, cleaning up spills immediately prevents long-lasting stains.
By following these steps and staying on top of regular maintenance, your car will stay looking fresh and new, just like the day you drove it off the lot!
That’s my personal approach to cleaning and detailing a car like a pro. Not only does it keep my car looking fantastic, but it’s also a relaxing way to spend a few hours on the weekend. So next time you’re ready to give your car a makeover, grab your tools, put on some music, and dive in—you’ll be amazed at the results!